2dActor Plus Documentation


Information about the features of 2dActor Plus, and how to use the animation system.
Quick Navigation
Introduction
2dActor Plus arrives as the ultimate solution for Unreal Engine's limited support for 2D Animation, through a data-driven framework that allows users to build fully animated characters with minimal setup and maximum flexibility.
Developed by a team of experienced animators with extensive experience in 2D animation for video-games, this plugin focuses on practical, production-ready features that address the most common challenges faced by developers working with 2D content in Unreal Engine.
This Plugin is built with the End User in Mind. We made it as intuitive and hassle-free as possible to implement, with plug-and-play features that feel like cheating.
Intuitive hassle-free architecture that will allow you to implement your animations in a matter of minutes!
100% built using Blueprints
1 Flipbook Rules Them All.
No more manual labor in setting up each and every animation in individual flipbooks "Idle_up", "Idle_down", "Run_left", "Run_right". 1 Flipbook handles everything.Automatic Direction Calculation.
As long as all directions contain the same number of frames, our plugin will do the math for you and it will just work!Easy Reskinning.
As easy as dragging & dropping the Flipbook File 1 time. Must have the same frames (if not, no problem! Just a couple files more need to be dragged!). Want to reskin during runtime too? You got it!Easy Layering, simplifying the creation of multi-layered characters.
Simply add a new flipbook component with the same frames as the parent and you're done! It will work seamlessly.Advanced Animation Settings.
PingPong, Repetition handling, Follow-up Animations, Individual Frame Time Adjustment, and more.Supports any number of directions (1,2,4,8,...) and auto-mirrors user-defined directions.
Want the sprite's left direction to mirror when the character is facing right? Just type "Right > Left" in the Direction Profile Asset and you're done!Per-frame Signals (aka Notifies)
Implement custom behaviors, such as triggering sounds, etc on a specific frame of the animation.
Features
In addition to all of these wonderful features we also included a pre-made Character Base, that has some useful functions for the Animation State Machine and handles basic character movement. In addition, we have also included a Side-view Fighter Character template and Topdown RPG Character Template.
Sample Objects Included
For questions or support, consider joining our Discord Server
Installation
After downloading the plugin from Fab, search for 2dActorPlus in your Library click on "Add to Project", then select the project you wish to add it to.
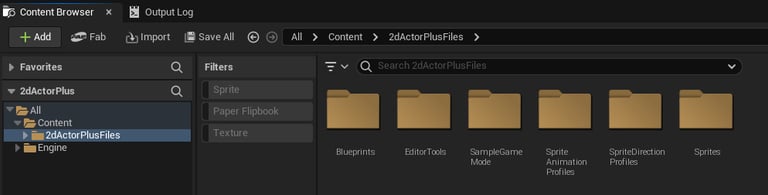
Reset your project, and a new folder called "2dActorPlusFiles" will appear. Here is where the main files of the animation system are stored.

It is strongly advised that you do not make changes to BP_2dActorPlus or BP_2dActorPlus_CharacterBase unless you know what you are doing. It's preferable to create a new Blueprint that inherits from them.
Getting Started: Create a 2d Actor
>Note: Some file names may be outdated in the screenshots throughout this document. This will be fixed at a later date.
Throughout this documentation, actors built using this plugin will be referred to as 2D Actors.
So let's create our first 2D Actor!
There are a couple of ways we can go about this. We can either inherit from an existing BP_2dActorPlus class, or we can copy one of the existing "BP_2dAP_" templates.
Because this tutorial is focused on showing you how to quickly setup a character with animations without going over character controls, we will use one of the templates that we included in the plugin.
If you don't want to use one of our templates and prefer to setup the character controls yourself instead, click here.
2. 2d Actor Custom Variables
On the 2dActor Folder, rename the newly created blueprint as "2dAP_MyCharacter" to better differentiate it from other charcters, or "BP_My2dActor" if you prefer. Then, open the blueprint to inspect it.
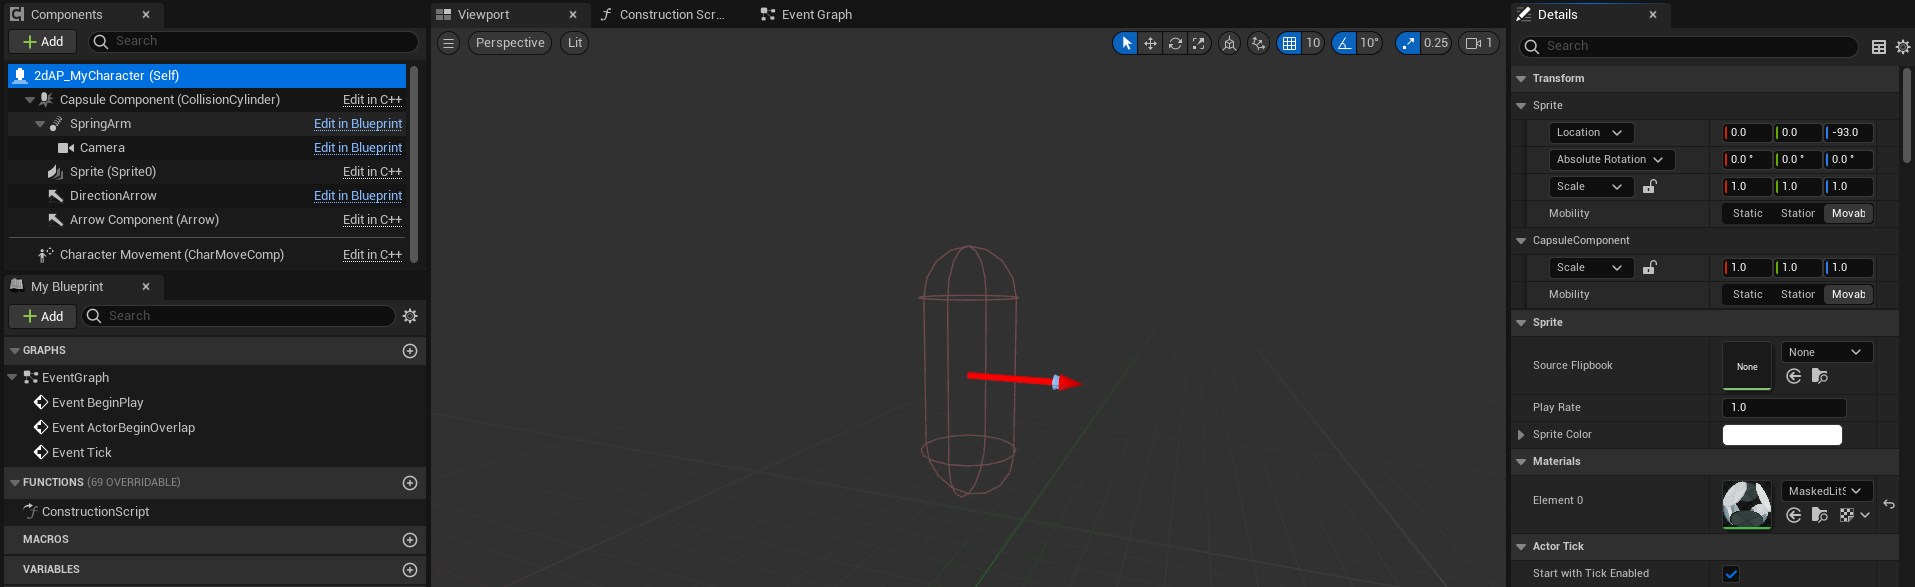


Here you can find the usual Class Defaults of the character class. Drag down until you find "2d Actor Settings", where you will find the variables and assets that you will need to populate in order to properly setup your 2dActor Character.
Among these are:
Sprite Animation Profile: This asset is used to setup all of the animations for your character.
Sprite Direction Profile: This asset is used to gather information about the directions contained in the sprite, their order in the master flipbook, and whether or not it should mirror certain directions.
These settings will be very important to setup our character later on, but first we need a sprite for our character. For that effect, we have prepared a set of graphics for you.
1. Creating 2d Actor Blueprint
Create a new folder inside your Content folder and call it "2dActors". Navigate to the 2dActorPlusFiles folder -> Blueprints -> Templates and grab the template "BP_2dAP_BlankPlayerCharacter". Drag it over to your 2dActors folder, and upon releasing the mouse button, select "Copy Here" from the context menu.


Note: This is equivalent to creating a new blueprint that inherits from 2dActorPlus_CharacterBase and then adding player movement controls. In this case, however, those steps have been completed for you.
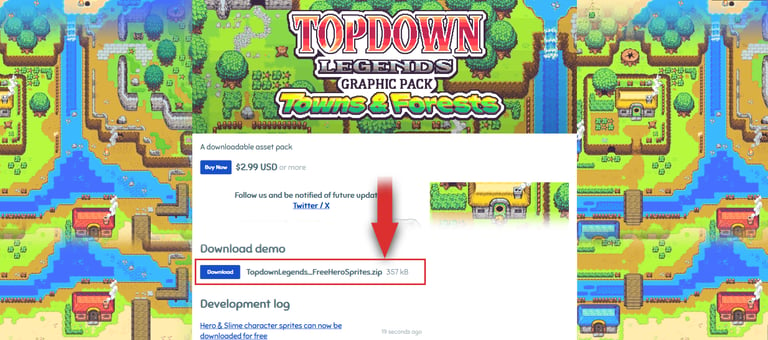
Follow the button below to be sent to one of our graphic packs, where we prepared a set of free animated sprites for this tutorial.
Upon entering the store page, scroll down and you will find a button to download the file TopdownLegends_FreeHeroSprites.zip for free.

3. Adding a Sprite
After you downloaded the free assets, extract the .zip file into a folder of your preference. Open the extracted folder and go to 16x16 -> Unreal 5 - 2dActorPlus.


On your 2dActor folder (inside Unreal Engine), create a new folder called "2dActorGraphics", inside it create another folder called "MaleHero", and inside this create a folder called "Frames".
Once you're done, move back to the Main Hero Folder, and select the following files from the Free Hero Sprites folder: "MaleHero" and drag it into the MaleHero folder inside Unreal Engine until your folder looks like this:


Right-click the imported sprite sheet and choose: Sprite Actions -> Apply Paper2D Texture Settings. Then, right-click again and select Extract Sprites. A new window will open where you can divide the sprite sheet into individual frames. On Extract Sprite Mode select "Grid", and input the following values:
Cell Width: 54
Cell Height: 64
After clicking Extract your folder should be filled with individual frame files. Select all of the generated frames and drag them all into the "Frames" folder.
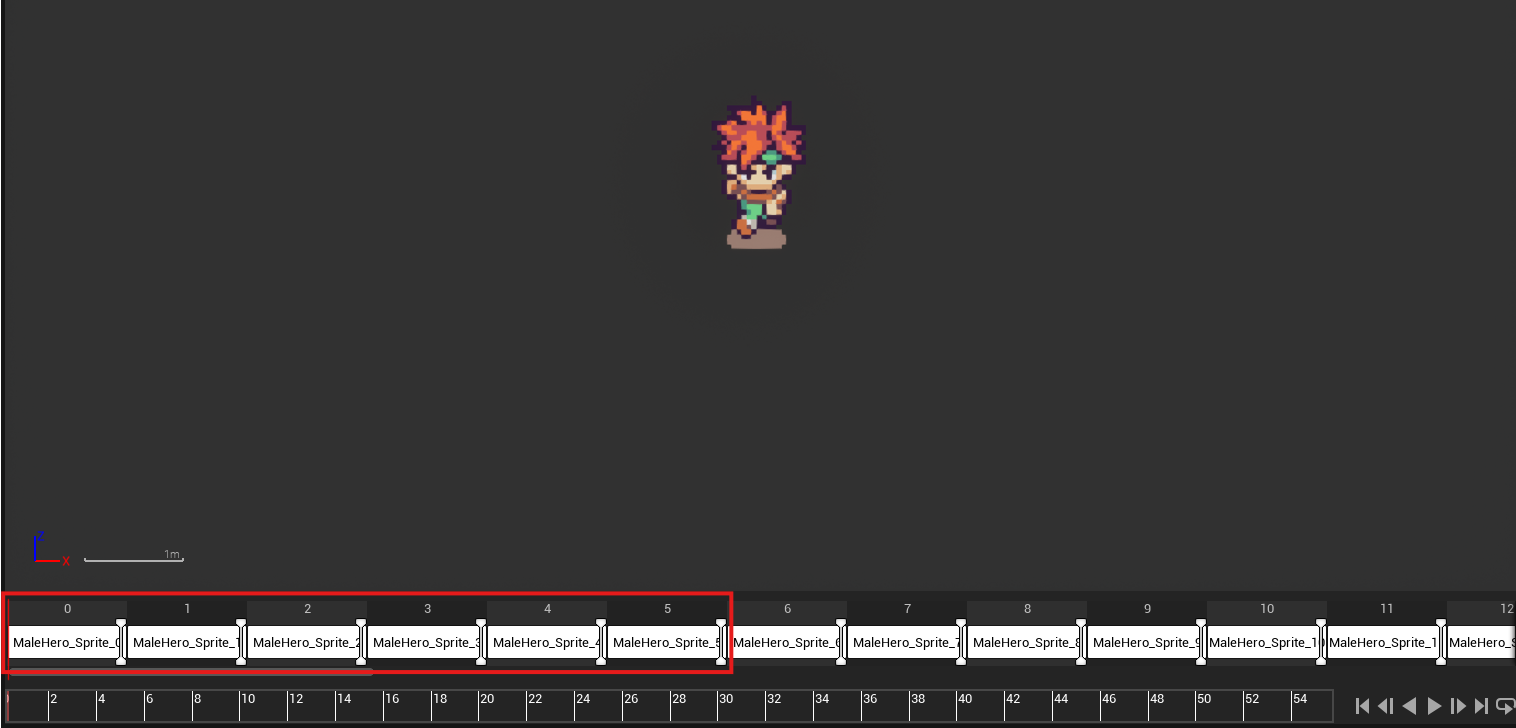
Inside the Frames folder select all of the frames present there, right-click and select "Create Flipbook" (yes, of all the of the frames together!). Name the newly created Flipbook "FB_MaleHero" and move this file outside of the Frames folder, just so it's easier to access if needed.
*Note: Make sure to also adjust the character's Pivot Point position. To do this go back in the Frames folder, make sure to select all of the frames once again, right-click -> Asset Actions -> Edit Selection in Property Matrix. Then, select all of the items in the newly opened window and on the right-side menu click on the Details tab. Then, look for Pivot Mode and set it to "Custom". Below this item will appear a new one with the text "Custom Pivot Point" and 2 text boxes next to it with "Multiple Values". Set the second text box to 47.0.
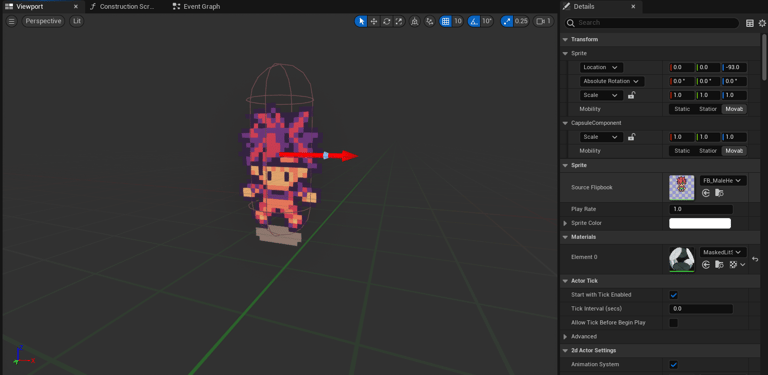
We now have the Flipbook created. Let's open our 2dAP_MyCharacter blueprint (or whatever name you gave it), and on the class Defaults, set the Source Flipbook to the Flipbook we just created.

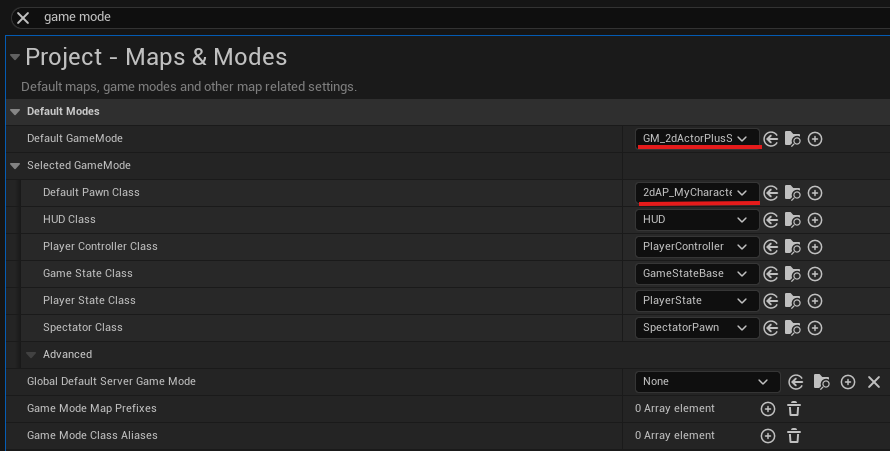
Let's test it now! On Project files set this character to be the Default Pawn Class so we can take control over it. Optionally you can also set the Default Game Mode to "GM_2dActorPlusSample", which we prepared for our users to be able to quickly test our plugin.

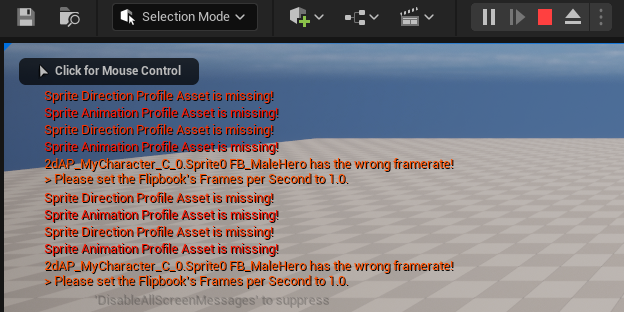
Hit Play and let's see what we got.... and uh-oh it looks like we got a bunch of errors.
These errors are here to remind you of what you might have missed. So let's look at them:
- "Sprite Direction Profile Asset is missing!"
- "Sprite Animation Profile Asset is missing!"
- "2dAP_MyCharacter_C_0.Sprite0 FB_MaleHero has the wrong framerate!
> Please set the Flipbook's Frames per Second to 1.0."
Well go over these one by one.
To start with, we will need to set the Flipbook's Frames per Second to 1.0 as requested. This is important because the plugin selects the frame to be played based on its position in the Flipbook timeline based in seconds. If you plan on using a Flipbook for a 2dActor, you need to set the Frames per Second to 1.0.
Now that we've got this out of the way, we will proceed to fix the next error.
Sprite Direction Profile
Here you are going to learn how to setup a Sprite Direction Profile for your character.
The Sprite Direction Profile (SDP) is a Data Asset that is used to inform the system of how many directions your character sprite is composed of. This is then used to calculate the values we configure on the Sprite Animation Profile, and automatically figure the correct frames for each of the animations you configure.
Without this asset, the whole system will not know how to apply the animations you created, so you must always make sure to attach the correct Sprite Direction Profile to your character.
1. Setting up a new Sprite Direction Profile Asset
The SDP asset must be composed of:
A list of the directions present in the actor's sprite
The in-world angle corresponding to each direction
The list of directions must be in the same order as in the Flipbook.
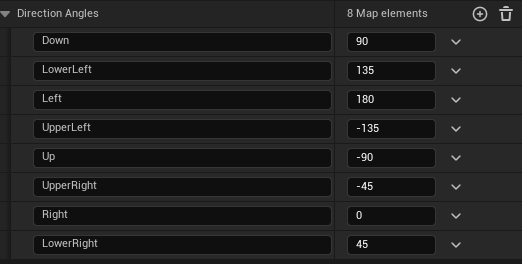
Whenever you create a new Direction Profile Asset, it will load a preset like the image to the right, which already containts predefined angles for each direction. If your character contains any these directions, you simply need to change the order of the items to match the direction order of your character, and remove the directions you don't need.
3. Assigning a Sprite Direction Profile on your character
Whether you created a custom Direction Profile, or are using one of the already available templates, here's how you assign SDP to your character.
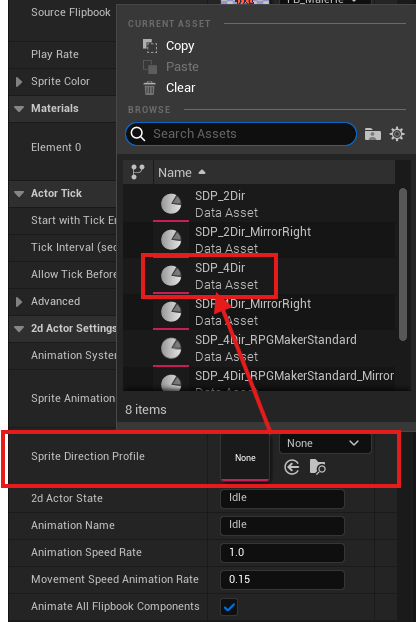
Open the 2dAP_MyCharacter blueprint and on the Details menu, you can find "Sprite Direction Profile" inside the 2dActor Settings section. Click on the dropdown and select the Sprite Direction Profile you wish. If you're following the basic tutorial, choose template "SDP_4Dir".
And that's it! Your character's SDP is fully configured!
We have included a number of Direction Profile Templates that should be able to cover most cases as part of the plugin files. However, there may be times where you need to create your own Direction Profile, in case your sprite doesn't conform to the available templates. In such cases, all you need to do is create a new data asset file is follow these steps:
To create an entirely new Sprite Direction Profile Asset, follow these steps:
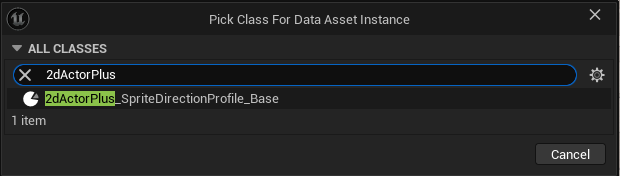
Create a new folder called "SpriteDirectionProfile". Inside it right-click and select Miscellaneous -> Data Asset.
On the window that appears search "2dActorPlus" an select the option "BP_2dActorPlus_SpriteDirectionProfile_Base"
Name the created asset as "SDP_YourName", and edit its contents to be compatible with the directions of the character you're creating.
2. Mirrored Directions
Our Plugin supports Mirrored directions, and will do all of the work for you. If your character's sprite has a certain direction that is supposed to be mirrored (for example: the sprite should mirror when looking left), you can set this up by simply setting the name of the direction like so:

In this case we have a character with 2 directions, where the sprite only contains 1 direction: the left one. So in order to make the character simply mirror the left direction when facing right, we only need to setup the name to be "Direction > MirrorTarget", in this case it's "Right > Left". The symbol ">" is important to inform the system that this is a mirrored direction and check what direction is being mirrored.
Sprite Animation Profile
Here you are going to learn how to setup a Sprite Animation Profile for your character.
The Sprite Animation Profile (SAP) is a Data Table Asset where we can define what animations are present in the 2d Actor's Flipbook and what settings we want to apply to them, so that once we test our character all of those animations play as intended. The reason it's called Sprite Animation Profile, is that it is supposed to act as a profile to be shared by multiple actors. Because this plugin is made with reskinnability in mind, as long as the different characters you have contain the same frames and animations, all you need to do is swap the Source Flipbook and it will work seamlessly. This is largely achieved by the Sprite Animation Profile.
Quick Navigation
1. Creating a New Sprite Animation Profile
To create a new Sprite Animation Profile, create a new folder next to you 2dActor_MyCharacter and name it "SpriteAnimationProfiles". Inside that folder, right-click and select Miscellaneous -> Data Table.
A window will appear named "Pick Row Structure". Click the dropdown and search for "2dActorPlus", and the correct asset will appear right away, named "F_2DActorPlus_SpriteAnimationProfile_Structure". Pick it and click OK.
This is where you will setup your animations. Each animation corresponds to a single row on the Data Table, and each has its own settings. We will now go over each of the settings in available and how they affect your animations, and will simultaneously build the animation that we'll use for both Walk and Run for our character. We will start by changing the name of this row from "NewRow" to "Walk".
Now let's look closely at each available setting.
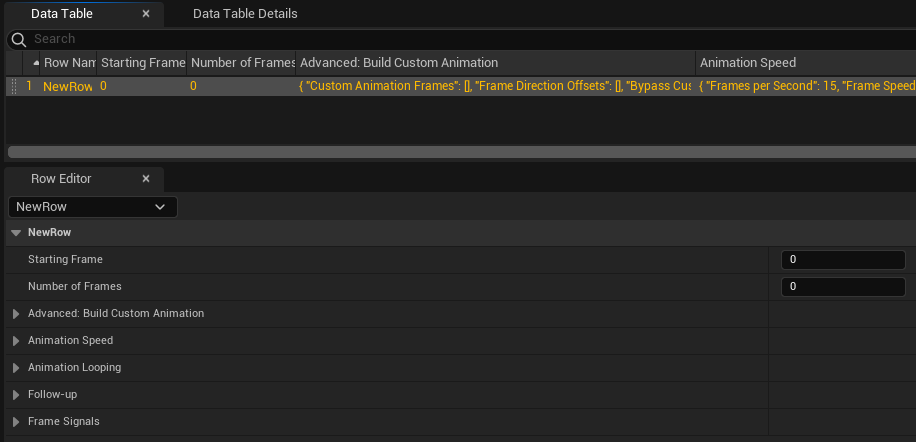
Name the newly created asset as "SAP_RPGHeroProfile" and open it. Click the "+Add" button to add a new row and you will be met with something like this:


We will start by looking at the Basic Settings.
Starting Frame: Corresponds to the frame at which the desired animation starts (in this case the walk animation), note that this only corresponds to the first frame of the first direction.
Number of Frames: Corresponds to the number of frames the animation has per direction. Make sure to not use the total number of frames of all directions, only the first direction.
Example: In this case, our character has 4 directions and the run/walk animation is composed of 6 frames per direction. The walk/run animation is the first one in the flipbook, so we set Starting Frame to 0 and Number of Frames to 6. We can figure this out by opening up the 2dActor's Flipbook and look at the frames:

2. Basic Settings
3. Advanced: Build Custom Animation
Next we have the Advanced: Build Custom Animation Group.
In this area you're able to do exactly what the name suggests, there might be times where you may want to repurpose frames from different animations (albeit from the same flipbook) to create a new animation. You can achieve that here.
Custom Animation Frames: Specify the frames that compose this custom animation in the order that you want them to be played. Note: if you want this animation to be played in all of the character's directions, it must include only frames of the first direction. First direction relates to the first direction that appears in the flipbook (Example: Down)
Frame Direction Offsets: This is only relevant if you character has more than 1 direction (or non-mirrored 2). For each of the custom frames you setup above, you must input the number of frames until the next version of the same pose in a new direction. So that the engine can properly calculate when to display each direction.
Bypass Custom Animation Frames: By populating the Custom Animation Frames field, the system will automatically prefer the frames you setup over the ones on Basic Settings. If you want the system to ignore any input Custom Animation Frames, check this checkbox. This is useful mainly for testing/experimentatio purposes.
This area can be a bit complex to fully understand, so later on we're going to teach you how you can use this to create an Idle animation out of certain frames from the walking animation of the character we are working on.
For now let's proceed to the next group.

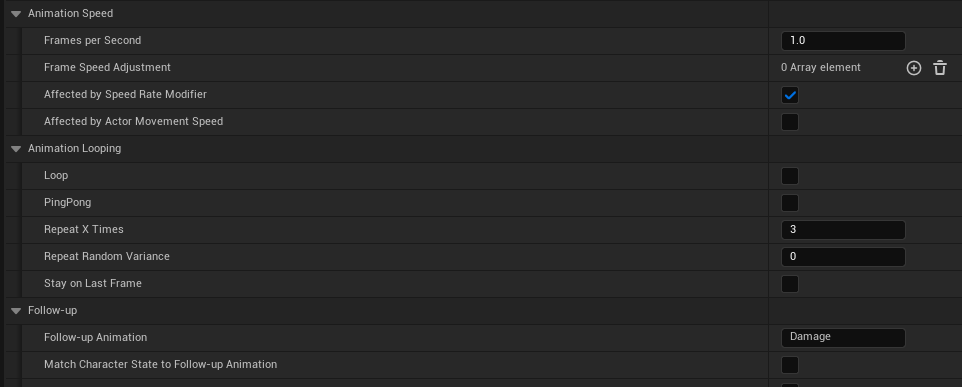
4. Animation Speed
In this field you are able to control the speed of the animation. There are a few options that work as follows:
Frames per Second: This corresponds to the overall speed of the animation. Larger numbers make the animation faster, smaller numbers make the animation slower. For the purposes of the basic tutorial, keep this value as 15.0.
Frame Speed Adjustment: This allows you to set individual speed adjutments to each frame, allowing you to make some frames last longer than others. This is an array type value, so each element corresponds to a frame. (0 = frame 1; 1 = frame 2; 2 = frame 3; and so on)
Affected by Speed Rate Modifier: Determine whether this animation is affected by the variable SpeedRateModifier, which allows you to modify the speed of your character's animations globally. This can be useful to easily create slow-motion effects, or even a Haste effect like that found in certain JRPG games.
Affected by Actor Movement Speed: Whether this animation's speed will be affected by the speed of the character's movement. This is very useful to create animations that change their speed depending on the speed of the character's movement. Such as a walking or running animation.
For the purposes of the basic character tutorial, check this box.

5. Animation Looping
This field allows you to control the looping of the animation. The available options work as follows:
Loop: Makes the animation loop. If unchecked, once this animation ends, it will return the previous one.
PingPong: If you're familiar with older JRPGs you may recognize this effect. It essentially creates a pingpong effect on the animation, making it reverse once it loops around. For example, a regular looping animation will play like this: (1 -> 2 -> 3 -> 1 -> 2 -> 3), while a PingPong animation will play like this: (1 -> 2 -> 3 -> 2 -> 1). This can be useful for walking animations with only 3 frames, or other types of play & reverse animations.
Repeat X Times: Will force the animation to repeat X amount of times before ending (after which it will return to the previous animation). This value is ignored if "Loop" is checked.
Repeat Random Variance: Adds randomness into the amount of times that the animation will repeat. Can be useful if you have a certain attack that should repeat x + random amount of times, or an idle animation that repeats a random amount of times before playing an emote.
Stay on Last Frame: This option exists to override the normal behavior of returning to the last animation upon ending. If this option is checked, the animation will simply stay on the last frame until you change it manually. This is ignored if "Loop" is checked.
You can keep all of the values as they are for the purposes of the basic character tutorial.

6. Follow-up
This field allows you to setup follow-up animations that will play once your animation ends. This can be very useful to create animations that cycle from one to another, such as a character going from idle to an "impatient" emote, or stitching together multiple animation skills. There are many things that can be achieved with this.
Note: This section is only valid if "Loop" is unchecked on the previous section, otherwise it will be ignored.
Follow-up Animation: Write the name of the animation you wish to play upon ending. You can place more than one animation, by separating them with a comma (,) and the engine will choose one of them randomly. (example: Emote1, Emote2; in this case the engine will pick either Emote1 or Emote2 randomly)
Match 2d Actor State to Follow-up Animation: This is an important option that interacts with some core systems of the 2dActor Class. In this case, it forces the variable 2dActor State to match the defined animation. If you want more information about 2dActor State, click here.
Print Follow-up: Whether to print the follow-up animation name when activated. Used for debug purposes only.
For the purposes of the basic character tutorial, you can keep these values untouched.

7. Frame Signals (aka Notifies)
Frame Signals (aka Notifies) allow you to setup signals to be sent whenever a certain frame starts playing. This is most often used to trigger special events such as playing a sound, running calculations, or spawning a particle effect on the character.
Signals: This is a Map data type. It takes an integer value on the left-hand side that corresponds to the frame at which this signal will be called, and a Name value on the right-hand side that corresponds to the name of this signal. Only one signal per animation frame is allowed.
Print Signals: Whether the to print the signals. Used for debug purposes.
When a Signal is activated, the Event Dispatcher "On Frame Signal" is called passing the name of the signal that was triggered. By binding the Event Dispatching to an event, you can assign behaviors to it. In addition to this, the 2dActorPlus variable "FrameSignal" will be set to the Name of the triggered Signal for 1 tick, offering a different way to access a signal.
In addition, there are 2 Signal-like Event Dispatchers that are called by default on every animation. These are "OnAnimationStart" and "OnAnimationEnd", both of them pass the Animation Name, and OnAnimationStart also passes the Previous Animation Name and FrameIndex. You can use these to apply certain effects whenever animations start or end.
For the purposes of the basic character tutorial, you can keep these values untouched.
This concludes the explanation for the Sprite Animation Profile. As you can see, this system offers a myriad of options for you to play with in order to create interesting animations for your game!
For the purposes of the basic character tutorial, we have completed the Walk/Run Animation. Now it's time to see how it looks in-game!
8. Conclusion
Create a 2dActor: Testing
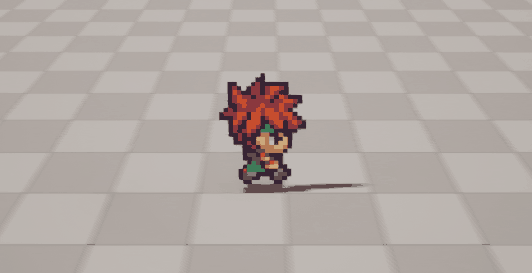
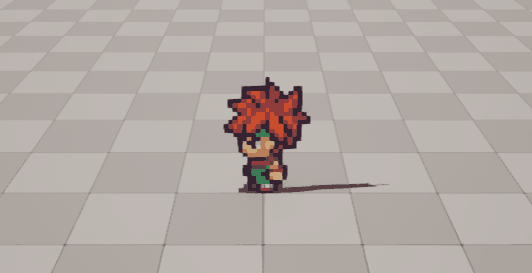
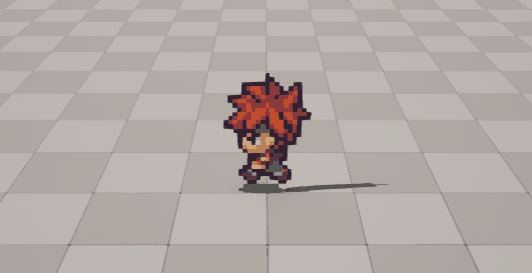
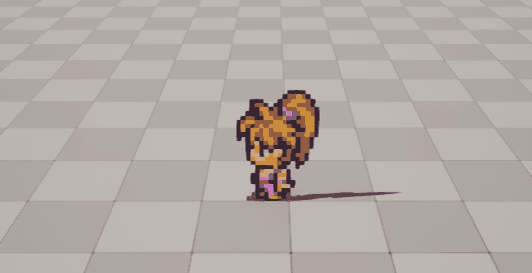
Now it's time to test it. Move your character around, and should something something like this:
*Tip: You may want to turn off Motion Blur and Anti-aliasing in your Project settings to remove the visual artifacts like those seen here.
If you didn't get the desired result:
Make sure that you named the animation row correctly. In this case it should be called "Walk".
Make you selected the correct Sprite Direction Profile for the actor. In this case it should be "SDP_4Dir"
Make sure you selected the correct Sprite Animation Profile. In this case it should be "SAP_RPGHeroProfile"
Confirm that the value of Frames per Second on character's Flipbook is set to 1.0
If you checked these points and still don't have the same results, make sure to double-check and carefully read the names of the assets you attached to your actor, check if there are any errors that being printed on the screen or output log, and finally make sure your animations are setup correctly on the Sprite Animation Profile.
Assuming you got the desired result, did you notice how the system figured out the correct frames for each direction? That is done using a combination of the Sprite Direction Profile, and a properly configured Sprite Animation Profile, and it makes creating characters easy and fun! No more need to create individual Flipbook assets for each single animation such as "Walk_up", "Walk_down", "Walk_left", etc. After you've attached the correct Sprite Direction Profile, all you need to do is configure the animation on the Sprite Animation Profile and it will do all of that boring work for you!
You also may have noticed that the character's Walk animation speeds up and down depending on the character's speed, and all you had to do was check a box, isn't that great? If you'd like to make adjustments to the animation speed, simply go over to the Animation Speed section, and change it to a value that pleases you.
If you followed the steps closely, you will have gotten a message saying:
"Idle animation is missing from 2dAP_MyCharacter_C_0's Sprite Animation Profile"
This simply means that the animation system asked for an animation called "Idle" (for when the character is standing still) and it didn't find it. You can ignore this for now, as it doesn't affect the behavior of the system. In fact, if there's a particular animation missing from your Sprite Animation Profile that is requested during the game, it will simply be ignored and it will not give you any errors, besides this warning (which only appears in playtesting). This can be useful in cases where you may have 2 characters sharing the same blueprint code, but one of them is missing a certain animation, it will still work.
For example, by default any character that inherits from BP_2dActorPlus_CharacterBase will have included a pre-made state machine (that you can override if you so desire) that handles Idle, Walk and Run animations. But our character uses the Walk animation we just created for both walking and running. We don't need to duplicated row named Run. We can just omit it, and it will still work.
You also may have noticed that our character's idle pose doesn't really look great though, as it just plays frames of the Walk animation! Don't worry about that just yet, we are going to fix that in a minute.
So now that you have an understanding of how the core systems work, let's implement the rest of the animations.
Create a 2d Actor: Other Animations
Now we need to implement the remaining animations. Each animation on this character has something useful to teach. Here are the animations that we still need to implement:
Idle
Attack
Damage
Death
Quick Navigation


If you PlayTest right now (and we encourage you to), you'll notice something interesting. Everytime the character stops moving, he will stand looking down, regardless of the direction he's supposed to be turned towards. There are times where it might be useful to have 1 direction forced for a particular animation (in fact we are going to do that later on), but in this case we want the character to face the appropriate direction when idle. So how can we achieve that?
Using the Frame Direction Offsets, we can tell the animation engine how many frames are there the same pose, but of the next direction. And we can easily figure that out by looking at the Flipbook asset and counting the frames untile the next frame of the same pose.


Specifically these frames are:
Down direction: Frames 1 &4
Left direction: Frames 7 & 10
Up direction: Frames 13 & 16
Right direction: Frames 19 & 22
All of these frames look like that character is standing still, but we can't just set the starting frame for the Idle Animation to be "1", as it will not display the correct frame for all directions since all of these frames are quite distant from one another. So what can we do? We can use Custom Animations Frames and Frame Direction Offsets.
Open up your Sprite Animation Profile once again, and add a new row. Call it "Idle". We're going to leave the settings "Starting Frame" and "Number of Frames" blank for this one, and instead will configure this on Custom Animation Frames. Add a new element to Custom Animation Frames, and set it to 1 (this is the number of the first frame for the idle pose. However, since both frame 1 and 4 are exactly the same, we only need frame 1 here.)
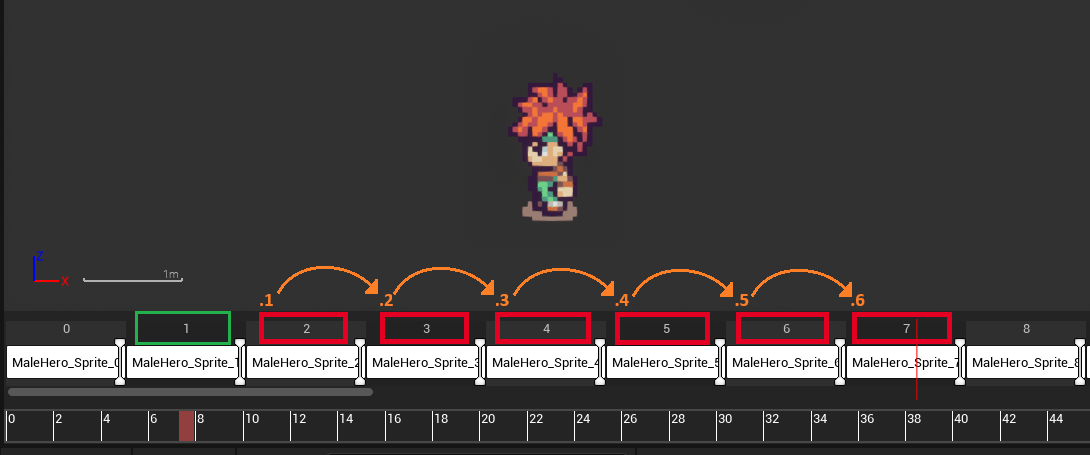

As you can see here, simply count how many frames are there until the frame equivalent of the next pose. In this case, from frame 1 to frame 7, are 6 frames. That's the value we will input on the Frame Direction Offsets.
(Frame 1 is the idle pose looking down, Frame 7 is the idle pose looking left. They are 6 frames apart from each other, so that's the value we put)

And that's it! No more setup is required, the system will just extrapolate to assume the rest of the directions. PlayTest and see the results.
*Note: If you're setting up multiple Custom Animation Frames, you need to set a Frame Direction Offset for each individual frame.
*Important: When setting up Custom Animation Frames for a character with more than 1 direction (or more 2 if one of them is auto-mirrored), you must only use frames from the first direction in Custom Animation Frames, so that the animation engine can correctly guess the appropriate frames for all of the directions, and not bleed into undesired frames. In this case the first direction,is down.
1. Setup Idle Animation
Let's proceed to the next animation: Attack Animation. Here you will also learn how to play animations on command.
Start by opening up your Sprite Animation Profile once again, and add a new row named "Attack". This animation appears regularly on the flipbook, so we don't need to use Custom Animation Frames here, we can use the basic settings.
Look inside the Flipbook and search for the frame the starting frame of the Attack animation, and how many frames it has per direction (all directions must always have the same number of frames, so you can just count the number of frames on the first direction). Put those values in Starting Frame and Number of Frames.
These are the values:
Starting Frame: 24
Number of Frames: 4
Set Loop to unchecked (under Animation Looping section).
The animation is now fully setup, however we have a way to test it right now. We need to create an event in the 2dAP_MyCharacter Event Graph that calls this animation. For this purpose, we have created a few useful Variables and Functions. Later on this document we will go into further detail about the available functions, but here I will teach you how to trigger the attack animation based from an Input Action. We have actually setup a few Input Actions as part of the plugin to make it easier for us to test things out.
If you want to use your own Input Actions, make sure to change the Mapping Context on the Event BeginPlay, otherwise you can use the Input Events we provide.
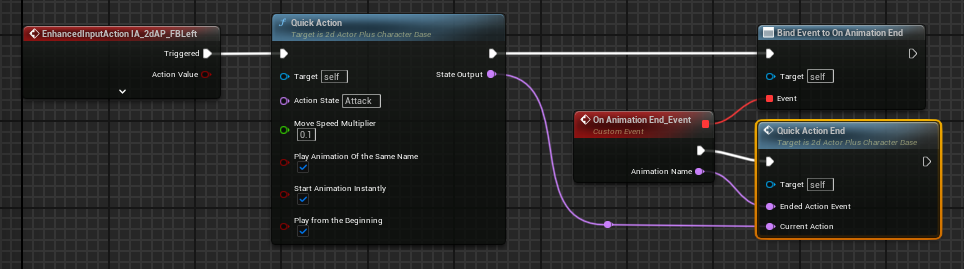
Open up your 2dAP_MyCharacter Blueprint and head over to the Event Graph. Right-click anywhere on the Event Graph and search for "IA_2dAP_FBLeft" (FBLeft stands for Face Button Left on the controller). Choose the highlighted option to create the event.
2. Setup & Implement Attack Animation

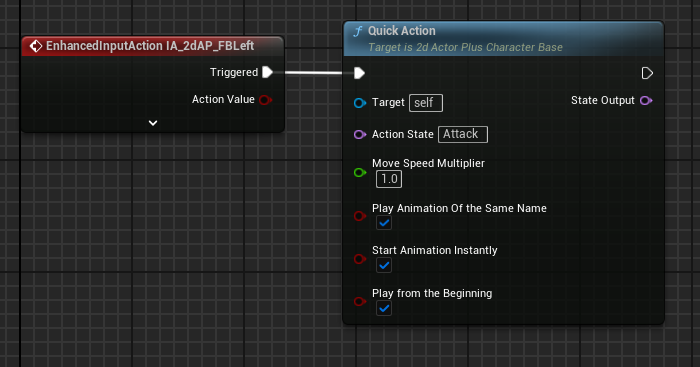
After you add the Input event, drag out a link from "Triggered" and search for the Function "Quick Action".
The Quick Action Function was created in order to provide a quick out-of-the box way to implement Action Animations. This Function makes use of the "IsLocomotion?" boolean which is a boolean that is used to start and stop movement animations from playing (Idle,Walk,Run), by making use of the 2dActorPlus main class function "Set 2dActor State" in order to set both the character's state, and the animation. (Click here to learn about 2dActor State)
Set Action State to "Attack" (the name of our animation), keep everything else like it is and let's test it out.
Press the "G" key when testing if you're using keyboard.
Once you test it out, you'll notice a couple of problems. One is that whenever you attack, the character keeps his speed. We want to the character to stop moving while attacking. This is easy to fix, simply set "Move Speed Multiplier" to something like 0.1, which will only allow a small amount of movement on the character.
The other problem we have is that while the Attack animation plays correctly, the character then stays stuck on the Idle or Walk animation (whatever was prior). This is due to a couple of reasons:
When the Attack Animation ends, it goes back to whatever the previous animation was.
The character gets stuck on that animation because even though the Attack animation ended, the Boolean "IsLocomotion?" is still false, which means that the movement animations cannot play. (This is due to how the Movement State Machine is built for 2d Actors that inherit from 2dActorPlus_CharacterBase)
*Developer's Note: These functions are only accessible on 2d Actor blueprints that inherit from 2dActorPlus_CharacterBase. The 2dActorPlus_CharacterBase is designed for a plug-and-play experience which is why it includes some quality-of-life functions like these, while the 2dActorPlus main class is designed for coders who prefer coding this kind of thing themselves.
If you want more information about each 2dActor Plus class, click here.
In order to fix this, we need to set the boolean "IsLocomotion?" to true as soon as the Attack Animation ends. Fortunately, we have an Event Dispatch named "OnAnimationEnd" ready for you that checks just that.
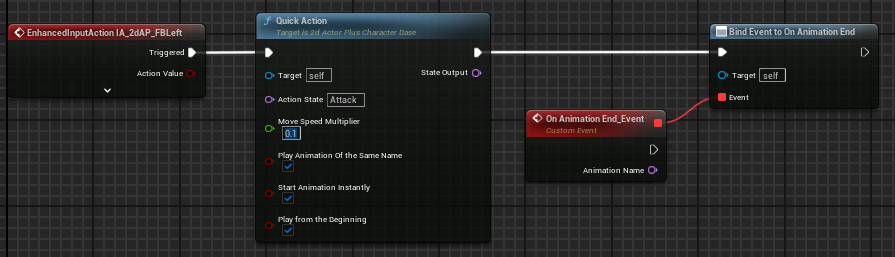
Right-clicking on an empty area next to the Quick Action function and search for "OnAnimationEnd". Pick "Assign OnAnimationEnd". This will create a Bind Event Dispatcher with an Event bound to it. Connect the Exec pin from the Quick Action function to the Bind Event Dispatcher like in the image below.
Essentially what happens is that as soon as the animation ends, the Event that is tied to the animation will be executed. So what we need to do now is twofold:
Reset Movement Speed
Set boolean IsLocomotion? to true (in order to allow the movement animations to play once again)
We could do this manually, and it would be pretty quick to implement, but since we used the Quick Action function to implement the attack, it would only be appropriate that we use a function called Quick Action End. And that's what we'll do. So, drag a link from the On Animation End_Event's Exec pin and look for "Quick Action End". Choose the function that appears in the results.
All the function requires is for you to provide the Name of the Animation that has ended (provided by On Animation End_Event), and the Name of the Current Animation (that you can get from the State Output pin of the Quick Action function). And you're done! The Quick Action End function will take care of setting IsLocomotion? to true and restoring the Max Walk Speed to its default value.
Test it to see the results.
3. Setup & Implement Damage & Death Animations
By now you should have a good understanding of how to create Animations implement them through Blueprints, so for the next 2 animations we will present 2 different ways of implementing them. This lesson will not focus on using the animations for their usual gameplay effects (we're not going to teach you how to code characters getting damaged or dying), instead we will focus on showing you 2 other ways of displaying animations. Through the use of:
Follow-up Animation
Setting 2dActor State
3.1 Setup Damage Animation as Follow-up
We will start with the Damage Animation. Since it's quite a comical looking animation, we will make it as a Follow-up to the Idle Animation. It will act like an emote that activates after the character has been idle for a while, sort of like Sonic the Hedgehog starts tapping his feet after being idle for a while.
So to start with, let's get back to our Sprite Animation Profile and add a new Row. Call it "Damage". Set Starting Frame and Number of Frames by looking for the starting frame of the Damage sequence in the Flipbook and count how many frames the first direction has.
The values are:
Starting Frame: 40
Number of Frames: 3
Uncheck "Loop".
Now, this alone will not do anything, we need to actually make the animation play. Remember that we want to use this animation as an emote for the Idle animation, so in order for us to do that we need to set the Damage animation as a Follow-up to the Idle Animation.
Select the Row of the Idle Animation and look for the setting "Follow-up Animation". It should be set to None by default. Set it to "Damage", make sure it's spelt correctly.
Now, if you were to test the animation right away, you would notice that nothing would happen. That's because the Idle animation is set to "Loop", and that means that it will just keep playing infinitely until it is changed manually. So, in order to fix that, you need to uncheck Loop.
If you test play right now, the first thing you'll notice is that the Damage animation starts playing almost instantly, and it looks like it just keeps looping. Well, that's because of two things:
The Idle animation is composed of only 1 frame, and so it ends almost as soon as it starts playing
Once the Damage animation ends, it goes back to the Idle animation (because it was the previous animation), but it just starts right away again due to the short length of the Idle animation.
So in order to fix this, we need to set the Idle animation's Frames per Second to 1.0, so each frame lasts one second, and set Repeat X Times to something like 2, for now.

If you test it now, you will see that after a couple of seconds the character plays the Damage animation and returns to the Idle Animation. However there's an important thing to note, even though the Damage animation goes back to the Idle animation upon ending, it's advised that you set the Idle animation as the Follow-up to the Damage animation as well (in a practical real-life case, it would be something like Idle -> Emote -> Idle).
*IMPORTANT: Follow-up animations are meant to be used only on animations that are supposed to in sequence. You shouldn't use this in an Attack animation, or something that is supposed to simply return the character to whatever animation it's supposed to play. Use this with caution.
Before proceeding to the final animation, as a small creative touch, go over to the Damage animation, check "PingPong", and set Repeat Times to 1.
Note: PingPong makes the animation go back and forth, but every time it reaches the final frame (whether the first or last), it counts as 1 repetition. So if you have a non-looping animation that you want to PingPong at least once, you need to set Repeat Times to 1.
You can also set Repeat Random Variance to something like 2, which will add a level of randomness to the amount of times the Idle animation repeats before proceeding to the Damage Animation.
Finally, as a final note, you can set more than one animation on the Follow-up field, and once it's time to pick which animation to play, one will be picked randomly. In order to do this, separate the animation names by a comma (,). Example: Damage, Attack.
3.2 Setup Death Animation through 2dActor State
Alright, we're almost done with how to implement animations. To finish this lesson, we'll now teach how to implement the death animation through the Set 2dActor State function.
This function is actually a function from the 2dActorPlus main class. So this would be (one of the ways) you would play an animation if your Actor wasn't inherited from 2dActorPlus_CharacterBase.
Before we start the implementation, it's important that we explain to you what "2d Actor State" is. 2d Actor State is a Name variable of 2dActors that essentially is used to create a State Machine.
If you are not familiar with the concept of State Machines, we advise you to search the subject, but it's nothing complicated really. It simply means that you can track and modify what the character is doing. In this case it's not referring to states in the RPG sense, but in the sense that the character can be walking or running, or attacking, or whatever you need. These are character states. And a state machine is used to track and change what the character does based on whatever conditions you define.
So now that we got out of the way, there are 2 state trackers in 2dActorPlus: 2d Actor State and Animation State (referred to in the code just as Animation).
And the reason we made these separate is because there might be situations where you may want to change one without changing the other. A practical example of this is the animation we setup prior to this — the Damage animation. Since we essentially used the Damage animation as a stand-in for an Emote-type animation, we don't actually want the Actor's state to be set to "Damage" when that animation plays, he's still just in Idle. So, in that situation, the Actor's remains is in Idle as his Actor State, while his Animation is set to "Damage".
The reason we are highlighting this distinction is because there 2 different ways to set an animation on your character. You can either do it by using the "Set 2d Actor State" function, or through the "Play 2d Actor Animation" function. And although they appear to essentially do the same thing, there are use-cases that differentiate them, as well as the order in which the changes are made.
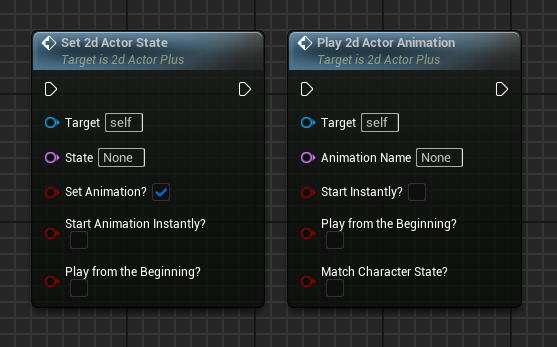
If you look at the functions side-by-side, you can see that they contain many of the same parameters, but the order at which they are processed is different, and that's because sometimes you may need to change the State when you change the animation, other times you may need to change the Animation when you change the state, and some other times you may need to change the one without changing the other.
These functions allow you to do all of the above as you need it in each particular situation.
If this sounded a bit confusing, don't worry about it, you will get used to it as you use the system. In fact one of the reasons we created the Quick Action function was to provide a simple way of using these systems without the need to fully comprehend them.
Before we proceed, let's look at what we've got in both Functions.
Set 2d Actor State's Parameters
State Name: Allows you to define what state you want to change the character to.
Set Animation?: If checked, it will automatically call the Play 2dActor Animation function using the same name as the State you defined. Useful if your animation and state have the same name.
Start Animation Instantly?: If checked, it will not wait for the current frame of the current animation to end, it will start this animation instantly. Has no effect if Set Animation? is unchecked.
Play from the Beginning?: If checked it will play the new animation from the beginning, otherwise, it will play from whatever frame it was on the previous animation. Can be useful to change between animations that are variations of one another but with different intensity of movement for example. Has no effect if Set Animation? is unchecked.
Play 2d Actor Animation's Parameters
Animation Name: Name of the animation to be played
Start Instantly?: As explained above.
Play from the Beginning?: As explained above.
Match 2d Actor State?: Similar to Set 2d Actor State's "Set Animation?", if checked this will set the Actor State to match the name provided for this animation.
Now that the Introduction of these Functions is complete, let's implement the Death animation using this method.
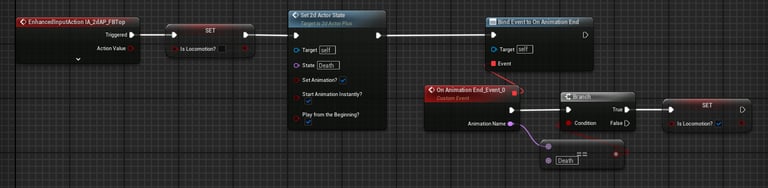
Because we just want to showcase the animation, we will assign the Death animation to the Event "IA_2dAP_FBTop" (FBTop stands for Face Button Top on the controller, this event is also assigned to "H" on the keyboard)
So, on the Event Graph right-click and type "IA_2dAP_FBTop", select the highlighted item to create this event. Drag a link out of the Trigger output and search for "IsLocomotion?", set it to false. Drag a new link and search for "Set 2d Actor State", set it to "Death" and check all of the checkboxes. Drag a new link and search for "OnAnimationEnd", choose "Assign On Animation End". Drag a link out of the red Event Node (call it something else if you wish), and search for "Branch". On the condition, check if the Event's parameter "Animation Name" is equal to "Death". If True, set IsLocomotion? to true.
Below is how your Blueprint should look like:

Now, if you test this, it will not work because we didn't actually setup a Death Animation on the Sprite Animation Profile. So let's do that.
Head over to your Sprite Direction Profile, and add a new Row. Call it "Death". Look for the starting frame of the Death sequence in the Flipbook and count how many frames it has. Something that you will notice is that this sequence actually only has one direction. This is where our old friend Custom Animation Frames comes into action again. Because the Death Animation only has one direction, we don't need to setup Frame Direction Offsets this time.
So, on the Custom Animation Frames populate the array with the frames that compose the Death Animation.
The values are: 52, 53, 54, 55.
Uncheck "Loop" and set Frames per Second to 5.0
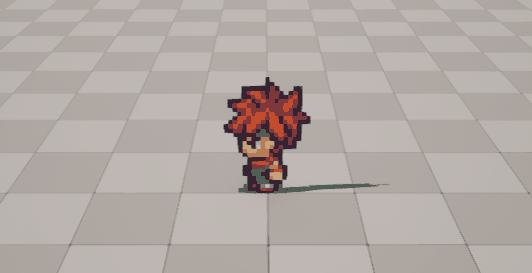
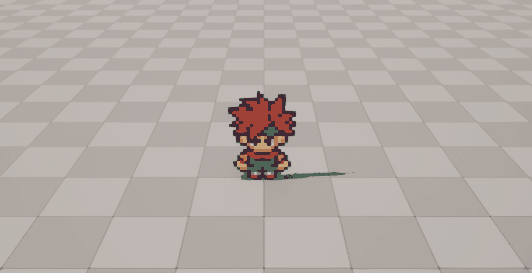
Test the animation! This should be the result:
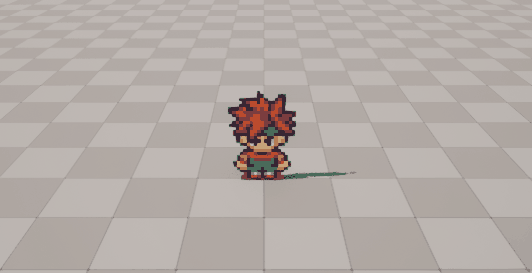
It's working! You can prevent the character from going inside the ground, either by playing only up to the second frame (53), or by changing the pivot point of the last 2 frames.
*Tip: You can change the dynamic of the animation by setting values on Frame Speed Adjustment. Try applying the following values:


As you can see, you can use this setting to apply different speeds to each individual frame. This was just a small experiment to show what you can do with setting Frame Speed Adjustment values to each frame. Note that you don't need to fill this array with the same number of frames on your animation. Any non-existent index will be ignored. Each index corresponds to the appropriate frame in the animation. (Index 0 = Frame 1, Index 1 = Frame 2, Index 2 = Frame 3, and so on.)
It's also important to note that this setting is not exclusive to animations created using the Custom Animation Frames section, you can use this on any animation.
This completes our tutorial on setting up a basic 2d Actor!
We hope you enjoyed learning about the systems that our plugin provides, and you're able to see the potential that it offers. There are many more things that are worth learning about our plugin that will be explained further on this documentation, but this already offers you a good base to start working on your project.
Next we are going to learn about how we can reskin this character without any type of setup.
Reskinning
If you followed the basic 2d actor tutorial, you should now have your character fully setup. So now we're going to teach you how you can easily re-use the work you have made so far for a different sprite.
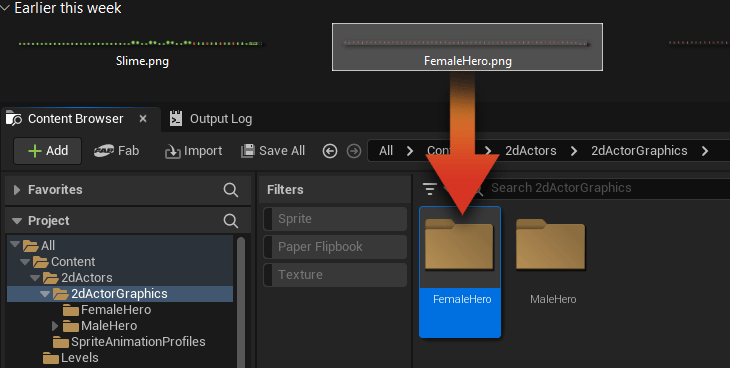
Start by creating a new folder inside your 2dActorGraphics folder (in UnrealEngine), and call it "FemaleHero".
Now, on your computer, open up the folder TopdownLegends_FreeHeroSprites once again, and head over to 16x16 -> Unreal 5 - 2dActorPlus.
If this sounds unfamiliar to you, consider following the basic character tutorial from the beginning, here.
Up until now we have been using the character "MaleHero", but we will now swap the graphic to use the character "FemaleHero" in a few easy steps. So drag that file over to your 2dActorGraphics folder, or wherever you keep your character graphics.

Once you have imported the file into Unreal Engine, right-click the sprite sheet file and select Sprite Actions -> Apply Paper2D Texture Settings.
We'll now go through the usual steps, which are:
Create a folder named "Frames"
Right-click the sprite sheet once again, and select Sprite Actions -> Extract Sprites
Set Sprite Extract Mode to "Grid", then set Cell Width to 54 and Cell Height to 64. Click Extract
Move the generated frames into your "Frames" folder.
Select all of the frames (Ctrl + A), right-click -> Asset Actions -> Edit Selection in Property Matrix.
On the Property Matrix, select all of the items, and set Pixels per Unit to 0.2. Then, set Pivot Mode to "Custom". Set the second value to 47.0.
Save and Exit the Property Matrix, and with all of the frames selected righ-click -> Create Flipbook. Set the name to "FB_FemaleHero".
Finally do not forget this important step: Open the FB_FemaleHero flipbook and set Frames per Second to 1.0.
We now have the female hero fully setup.
So, what do we need to use her sprite instead of the MaleHero one?
That's easy, we just go to our 2dAP_MyCharacter blueprint and change the Source Flipbook! Do that and test it to see the results :)
Congrats! You now have a fully working reskinned character and all you needed was to swap the Source Flipbook!
This showcases the potential of the 2dActorPlus Plugin for games that make use of many characters that contain the same animations overall.
If you're feeling confident, you can now try implementing the Slime skin in your character too!
Now that you have learned how to reskin the character through the Editor, you may be wondering if doing the same through Blueprints will be that easy? Yes, of course, simply use the "Set Flipbook" Node whenever you need to change the skin, and you're done!
With this system you can easily:
Create dozens or hundreds of characters that share the same frames and animations with little setup;
Implement a transformation skin to your character, such as a power-up state;
Change the skin of your character during runtime in a "select your character" type of system
And also...
Change the sprite of different layers of your character, like changing the equipment or character traits.
And now you may be wondering, "how can I implement multiple layers on my 2d Actor?"
We're glad you asked:
Multi-layered 2D Actors
In your game, you may want to display certain objects attached to your character. If it's a static object, it may be best to use Sockets. But, if the object is animated, our plugin supports multi-layer characters.
*IMPORTANT: To allow your 2d Actor to make use of the Multi-layer system, you must make sure that the boolean Animate All Flipbook Components is activated. You can find it under "2d Actor Settings" on the Details menu of your actor's main component.
In this lesson we are going to show you how to implement a sword that appears on our Female Hero's attack.
On your desktop, go over to the folder containing the sprite sheets. If you're using the graphics we provided make sure to go to 16x16 -> Unreal 5 - 2dActorPlus, and once there look for the file FemaleHero_Sword_3DWorld.png. Drag and drop it on your FemaleHero folder inside Unreal Engine.
Inside your FemaleHero folder, create a new folder called "Sword", and drag the sword sprite sheet in there. We'll now go through all of the usual steps:
Create a folder named "Frames"
Right-click the sprite sheet once again, and select Sprite Actions -> Extract Sprites
Set Sprite Extract Mode to "Grid", then set Cell Width to 54 and Cell Height to 64. Click Extract
Move the generated frames into your "Frames" folder.
Select all of the frames (Ctrl + A), right-click -> Asset Actions -> Edit Selection in Property Matrix.
On the Property Matrix, select all of the items, and set Pixels per Unit to 0.2. Then, set Pivot Mode to "Custom". Set the second value to 47.0.
Save and Exit the Property Matrix, and with all of the frames selected righ-click -> Create Flipbook. Set the name to "FB_Sword".
Finally do not forget this important step: Open the FB_FemaleHero flipbook and set Frames per Second to 1.0.
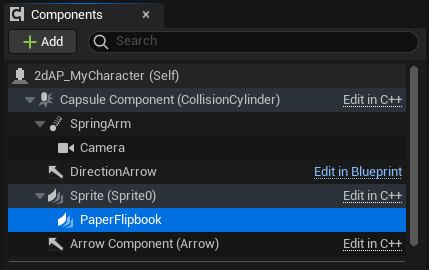
Now that we've got this completed, we need to create a new Flipbook Component on our 2dActor. So let's head over to the 2dAP_MyCharacter blueprint and with the current existing flipbook component selected (named "Sprite (Sprite0)"), click "+Add" and search for "Paper Flipbook". Select the highlighted option.
On the right-hand menu, set Source Flipbook to FB_Sword, and on "Location" set 0.1 on the y axis (the green one), so the sword appears in front of the character. Don't worry if you don't see the sword sprite on the Blueprint Viewport, it's there.

When test you it out, the first thing that you'll notice is that it's not working like we want it. If you move around, the weapon appears, but not when it's supposed to. We only want the sword to appear on the attack animation, but because the frames of the weapon sprite sheet don't match the frames of the Female Hero, there's a mismatch. So what can we do to fix this?
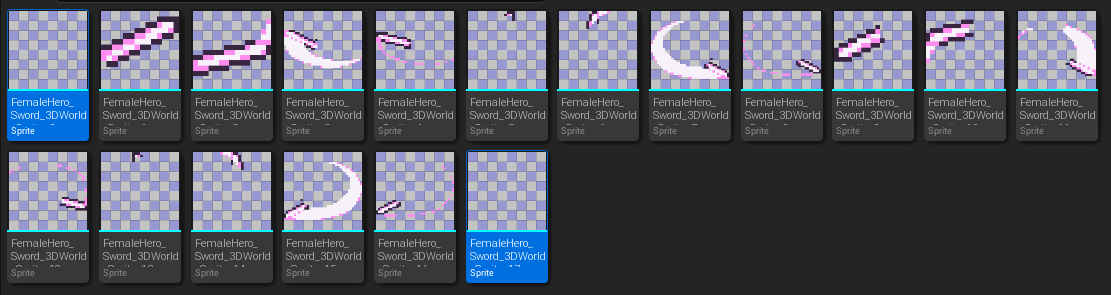
Well, if you look at the frames that we extracted from the sprite sheet, you can tell that the frames included are only for when the character is attacking, and two empty frames, one at the start and one at the end.

When test you it out, the first thing that you'll notice is that it's not working like we want it. If you move around, the weapon appears, but not when it's supposed to. We only want the sword to appear on the attack animation, but because the frames of the weapon sprite sheet don't match the frames of the Female Hero, there's a mismatch. So what can we do to fix this?
Well, if you look at the frames that we extracted from the sprite sheet, you can tell that the frames included are only for when the character is attacking, and two empty frames, one at the start and one at the end.
One way we could fix this would be by simply adding blank frames on the sword sprite sheet up to the frame that the attack animation is supposed to start, but that wouldn't be very practical. So, there's something else that we can do in this situation, and that's why we made those blank frames at the start and end of the sword animation.
Because use the Flipbook file to display the sword on our 2d Actor, we can take advantage of a feature available in Flipbooks that allows us to make a frame repeat for X amount of times. In this case, we'll just make the first blank frame of the sword animation repeat however many times needed until the frame where the sword appears lines up with the frame our Female Hero attacks.
So, we should go and check what is the first frame of the attack animation and set the first frame on the FB_Sword to repeat that same number of times.
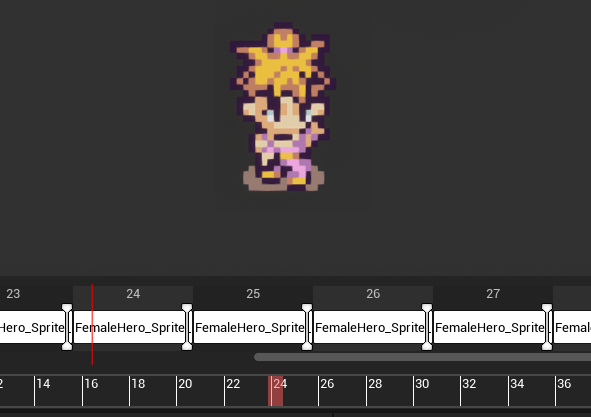
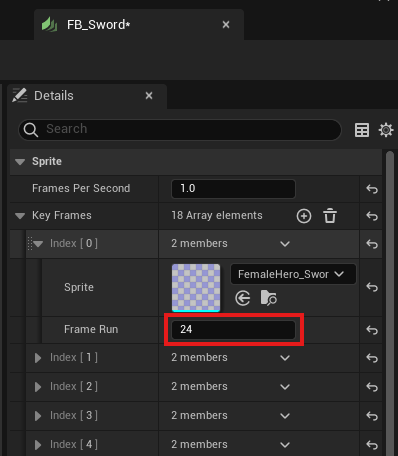
When we check the flipbook FB_FemaleHero, we can see that the first frame of the attacking sequence is frame 24. So, we can head over to the flipbook FB_Sword, and on the details panel, set the first frame (Index [0]) to 24. So that the actual first frame of the sword (when the sword graphic actually appears) it lines up with the character's attack animation.
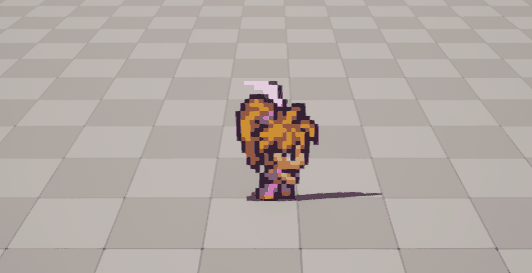
If we test it now, it should look fine!
And there you go! Our sword animation is fully setup. By this point, you should now have a good understanding how to implement multi-layer flipbooks, and how it will just work with little setup.
The key point to take from here is that the frames of all of the flipbook components need to always match. Otherwise the will not play at the correct time. However, we showed you it is possible to actually make an animation work, even if you don't have all of the frames on both spritesheets, as long as the frames line up in the Flipbook File. Using the blank frame trick is a way to solve that.
2D Actor Class Overview
There are multiple ways you can create a 2d Actor. You can either copy an existing Template, like we taught you for the basic character tutorial, or you can create a new Blueprint class that inherits from either 2dActorPlus (the main class), or 2dActorPlus_CharacterBase. Both are valid to create animated Actors, but there are some things to consider.
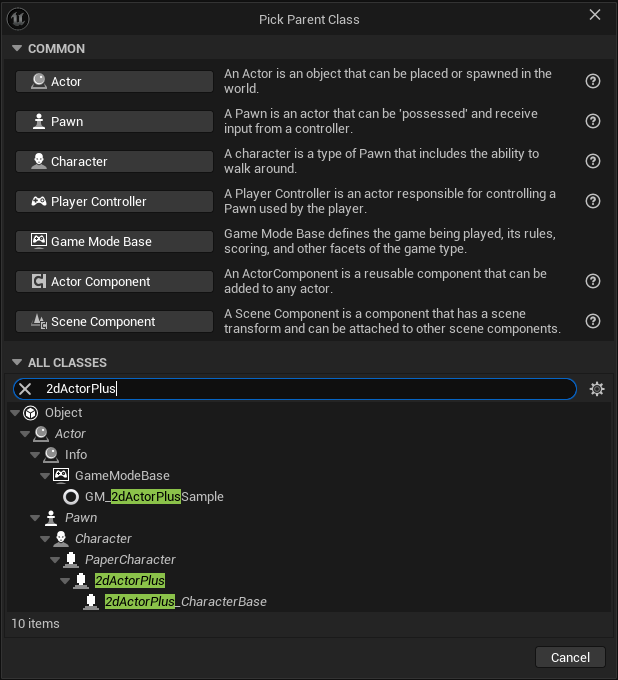

On your desired folder, right-click and pick "Blueprint Class". A window will appear asking you to pick a Parent Class. Search "2dActorPlus".
You will be presented with two options:
"BP_2dActorPlus" stands for the main class that inherits from PaperCharacter. You can choose this if you want to create for non-character actors (such as a projectile, or an animated environment asset), or if you want to build your character completely from scratch.
"BP_2dActorPlus_CharacterBase" inherits from 2dActorPlus and is designed with creating movable characters in mind. You may choose this if you want to create a character (such as a player controlled character, or NPC) and want to take advantage of quality-of-life features included for that purpose. Including the pre-made Movement State Machine and some other Functions such as the Quick Action function.
You may choose the one that better fits your preference/needs.
Variable List
List of Public Variables of the 2d Actor Plus class objects.
2d Actor Plus
Animation System (Boolean): Activate/Deactivate the Animation System.
Sprite Animation Profile (Object): Stores the Sprite Animation Profile Asset.
Sprite Direction Profile (Object): Stores the Sprite Direction Profile Asset.
Animate All Flipbook Components (Boolean): Whether to use the animation system on all of the Flipbook Components of this Actor. If set to false, only the Component "Sprite" will make use of the animation system.
Check For Mirrored Directions (Boolean): If set to true, it will check for Mirrored Directions on the Sprite Direction Profile Asset. It is recommended to leave this as true.
2D Orientation Fix (Boolean): In sprites that only have 2 directions, it forces the character to maintain the last direction when going up or down. It's recommended to leave this as true.
Lock Direction (Boolean): If set to true, will prevent the sprite from changing direction.
Movement Speed (Float): Tracks the movement speed of the Actor.
2d Actor State (Name): Stores the current state of the Actor, to be used in a state-machine.
Previous 2d Actor State (Name): Stores the previous state of the actor, allowing you to easily revert back to it. For more information on 2d Actor State, click here.
Animation Name (Name): Stores the current animation.
Previous Animation (Name): Stores the previous Animation, allowing you to easily revert back to it.
Animation Speed Rate Modifier (Float): Multiplies the speed of the animations by this value. Will only affect animations that have the option "Affected by Speed Rate Modifier" active.
Movement Speed Animation Rate (Float): Weight that the speed of the character has in affecting the speed of animations that have the option "Affected by Actor Movement Speed" active.
Schedule Follow Up Animation (Name): Tracks if there's any Follow-up animation scheduled. If there is it will be set to its name.
Animation Changed (Boolean): Whenever the character's animation changes this boolean is briefly set to true.
Animation Frame (Integer): Tracks the current frame being played on the entire Flipbook.
Animation Frame Index (Integer): Tracks the Frame of the current animation being played.
Animation Frame Duration (Float): Stores the duration (in seconds) of the current frame.
Animation Repeat Count (Integer): Tracks how many time the current animation has repeated so far.
Animation Repeat Variance (Integer): Stores the repeat variance value generated for the current animation (if valid).
Ping Pong Back (Boolean): Tracks whether an animation that 'PingPongs' is currently reversing.
Direction Changed (Boolean): Whenever the character's direction changes this boolean is briefly set to true.
Sprite Direction Index (Integer): Tracks the Direction of the character based on the Sprite Direction Profile.
Frame Signal (Name): Whenever a frame signal is sent, this variable will be set to that signal for a single tick, then be set back to None.
Frame Timer (Float): This variable tracks the duration of the current frame. Once it reaches the value of Animation Frame Duration it plays the next frame and resets. A common way of forcing the current frame to end is setting this variable to a high value, such as 100.
Mirrored Sprite (Boolean): Tracks whether the sprite is being mirrored or not.
Sprite Objects (Object), (Array): Returns a list of the Flipbook Components of the 2d Actor. Boolean Animate All Flipbook Components must be set to true.
2d Actor Plus Character Base
IsLocomotion? (Boolean): Enables/Disables movement animations (Idle, Walk, Run)
Default Walk Speed (Float): Stores the default value of the character's max speed.
Run Speed Modifier (Float): Value that is added to the Max Walk Speed when the character is running.
Function List
List of Public Functions of the 2d Actor Plus class objects. Many of these Functions contain the name "2d Actor" to make them easier to find.
2d Actor Plus
Pure Functions
Get 2d Actor Direction Angle: Returns the Z angle (Yaw) of the actor in Angle degrees.
Get 2d Actor Speed: Returns the current Speed of the 2dActor.
Get 2d Actor Angle from Interval: Returns the angle (Yaw) of the Actor rounded to the number of steps given. Useful for custom-coded Angle-based animations or behaviors.
Get 2d Actor Direction Index: Gets the current Direction Index of the actor. Same as using the Sprite Direction Index variable.
Get 2d Actor Direction Name: Gets the name of the current Direction from the Sprite Direction Profile asset.
Event Functions
Activate 2d Actor Animation System: Activate or deactivate the animation system. Has the same effect changing Animation System boolean directly.
Set 2d Actor State: Function used to changed the state of the actor.
State (Name): Name of the desired state.
Set Animation? (Boolean): Whether to also play the animation of the same name.
Start Animation Instantly? (Boolean): Forces the new animation to start instantly. If unchecked, it will wait for the current frame to end first. (Ignored if Set Animation? is unchecked)
Play from the Beginning? (Boolean): If checked, the animation will play from the beginning, otherwise it starts from the current frame of the current animation. Useful to implement certain types of dynamic animations.
Play 2d Actor Animation: Function used to play an animation.
Animation Name (Name): Name of the desired animation. Must exist in Sprite Animation Profile.
Start Animation Instantly? (Boolean): Forces the new animation to start instantly. If unchecked, it will wait for the current frame to end first. (Ignored if Set Animation? is unchecked)
Play from the Beginning? (Boolean): If checked, the animation will play from the beginning, otherwise it starts from the current frame of the current animation. Useful to implement certain types of dynamic animations.
Match 2d Actor State? (Boolean): Whether set the 2d Actor State to the same as the Animation.
Set 2d Actor Frame: Set the the animation to a specific frame from the entire Flipbook.
Set 2d Actor Frame Index: Set the animation to play a specific frame of the current animation.
Initialize 2d Actor Animation System: Used to Initialize the animation system. You should call this function whenever you change a character's Sprite Animation Profile or add/remove Flipbook components during runtime.
Finish Current Frame: Forces the current frame to end.
Mirror 2dActor Sprite: Mirrors the sprite.
2d Actor Plus Character Base
Pure Functions
Get 2d Actor Direction Angle (overrides original): An overriden version of the original Get 2d Actor Direction Angle available in the 2dActorPlus main class. In this version, the movement direction is also calculated to determine the actor's angle.
Event Functions
Set Speed from State: Changes the max speed of the character based on the given state. Note that this Function does not change the actor's state, only requests a certain speed based on the requested state.
2d Actor State (Name): Accepts "Idle", "Walk" and "Run". Will apply the max speed on the character appropriate to the requested state.
Movement State Machine: Handles the movements state-changing. This function is not meant to be called, as it is already called in Event Tick by 2dActorPlus_CharacterBase. You must override this function if you wish to make changes.
Quick Action: This function provides a quick way of performing an action-type animation. Such as an attack.
Quick Action End: This function is required to properly conclude the action-type animation, and return to the locomotion state.